Beginner Yoga Routine for Flexibility and Stress Relief at Home (20 Minutes)
The most common reason people avoid yoga: “I’m not flexible enough.” This is like saying you’re too dirty to take a shower. Flexibility is what yoga gives you. It’s not what you need to start.
If you’ve been carrying tension in your neck, back, or hips, or if your brain won’t slow down at the end of the day, this beginner yoga routine was built for exactly that. Twenty minutes, no equipment beyond a mat (or carpet), and no experience required.
We’ll also explain why this actually works at a physiological level, because once you understand that, it’s easier to stick with it.
What you’ll get: A complete 20-minute sequenced routine, hold times for every pose, breath cues, modifications for tight muscles, and the science behind why yoga relieves stress better than most people expect.
Why Yoga Works for Stress Relief (It’s Not What You Think)
Most people assume yoga helps stress because stretching feels good. That’s true, but it’s not the main mechanism.
The real driver is your breath. When you consciously slow your exhale, you activate the parasympathetic nervous system, the “rest and digest” state that counteracts the fight-or-flight stress response. This is a physiological shift, not a mindset trick.
Research published in the journal Brain, Behavior, and Immunity found that yoga practice decreases cortisol levels, your body’s primary stress hormone. Healthline’s review of yoga for flexibility also confirms that a consistent yoga practice increases range of motion and reduces muscle tension measurably within weeks. A separate review from Harvard found consistent yogis gained less weight during middle adulthood. Allina Health also notes that a regular yoga practice increases flexibility, strength, and balance while facilitating deep relaxation and had lower BMIs overall, in part because chronic stress drives fat storage and yoga interrupts that cycle.
The breath-movement connection in yoga is what makes it more effective for stress than simply stretching alone. Every pose in this routine includes a breath cue. Follow them and you get the full benefit. Rush through without them and you’re just stretching.
What You Need to Get Started
- A yoga mat or soft carpet (hard floors work but are uncomfortable for kneeling poses)
- Comfortable, non-restrictive clothing
- A folded blanket or firm pillow for modifications (helpful but not required)
- 20 minutes and somewhere quiet
You do not need yoga blocks to start, though they help in seated forward folds if your hamstrings are tight. A stack of books works fine as a substitute.
A Note on Modifications
Every pose in this routine includes a beginner modification. Use it. There is nothing to prove by forcing a stretch. The goal is to feel a gentle pull, not sharp pain. If something hurts in a joint (not a muscle stretch), back off or skip the pose entirely.
Yoga is one of the few forms of exercise where going easier is sometimes the smarter approach.
Your 20-Minute Beginner Yoga Routine
Move through this sequence in order. Hold times are listed for each pose. Breathe in through your nose and out through your nose (or mouth if that’s more natural for you) throughout.
1. Child’s Pose (Balasana) – 2 minutes
Kneel on the mat, sit your hips back toward your heels, and extend your arms forward on the floor. Rest your forehead down. This is your starting position and your reset pose. If your hips don’t reach your heels, place a folded blanket between your thighs and calves for support.
Breath cue: Inhale to expand your ribcage sideways. Exhale and let your body sink heavier into the floor. Feel your lower back release with each exhale.
What it does: Gently decompresses the spine, opens the hips, and signals to your nervous system that it’s time to slow down.
2. Cat-Cow (Marjaryasana-Bitilasana) – 2 minutes
Come onto all fours, wrists under shoulders, knees under hips. Inhale: drop your belly, lift your tailbone and chest (Cow). Exhale: round your back toward the ceiling, tuck your chin and tailbone (Cat). Move slowly with your breath.
Breath cue: Let the breath drive the movement. Inhale into Cow, exhale into Cat. One breath per movement.
What it does: Warms the spine, releases tension in the lower back, and establishes the breath-movement connection you’ll use for the rest of the routine.
3. Downward Facing Dog (Adho Mukha Svanasana) – 90 seconds
From all fours, tuck your toes and lift your hips up and back into an inverted V shape. Bend your knees generously if your hamstrings are tight. Press through your palms and lengthen your spine rather than forcing straight legs.
Modification: Keep knees bent. Straight legs are not the goal. Length in the spine is.
Breath cue: Breathe steadily. If you’re holding your breath, you’ve gone too far into the pose. Back off slightly.
4. Low Lunge (Anjaneyasana) – 90 seconds each side
From Downward Dog, step your right foot forward between your hands. Lower your left knee to the mat. Sink your hips forward and down to feel the stretch in the front of your left hip. Hands can rest on your front knee or floor. Hold, then switch sides.
What it does: Opens the hip flexors, which are chronically tight in anyone who sits for long periods. Tight hip flexors pull on the lower back and are a major source of that nagging low-back tension.
5. Seated Forward Fold (Paschimottanasana) – 2 minutes
Sit with legs extended. Hinge forward from your hips (not your waist) and reach toward your feet. If you can’t reach your feet without rounding your spine heavily, hold your shins or loop a strap or towel around your feet. A slight bend in the knees is completely fine.
Breath cue: Inhale to lengthen your spine. Exhale to fold slightly deeper. Never force the fold.
6. Supine Twist (Supta Matsyendrasana) – 90 seconds each side
Lie on your back. Draw your right knee to your chest, then guide it across your body to the left while extending your right arm out to the side. Look right if comfortable. Hold, then switch. This is one of the most satisfying poses in the sequence.
What it does: Releases tension in the mid and lower back, massages the digestive organs, and calms the nervous system.
7. Legs Up the Wall (Viparita Karani) – 3 minutes
Scoot close to a wall and extend your legs up it. Let your arms rest at your sides, palms up. This is a passive pose. You don’t need to do anything except breathe and stay here.
Breath cue: Extend your exhale. Try breathing in for 4 counts, out for 6-8. This lengthened exhale is the most direct way to activate your parasympathetic nervous system.
What it does: Reverses blood pooling in the legs, reduces swelling, and is one of the most immediately calming poses in yoga. If you only do one pose from this list, do this one after a long day.
Honest note: The first time you hold Legs Up the Wall for 3 minutes it might feel boring. By the third time, you’ll look forward to it. It takes a few sessions to fully drop into these slower poses.
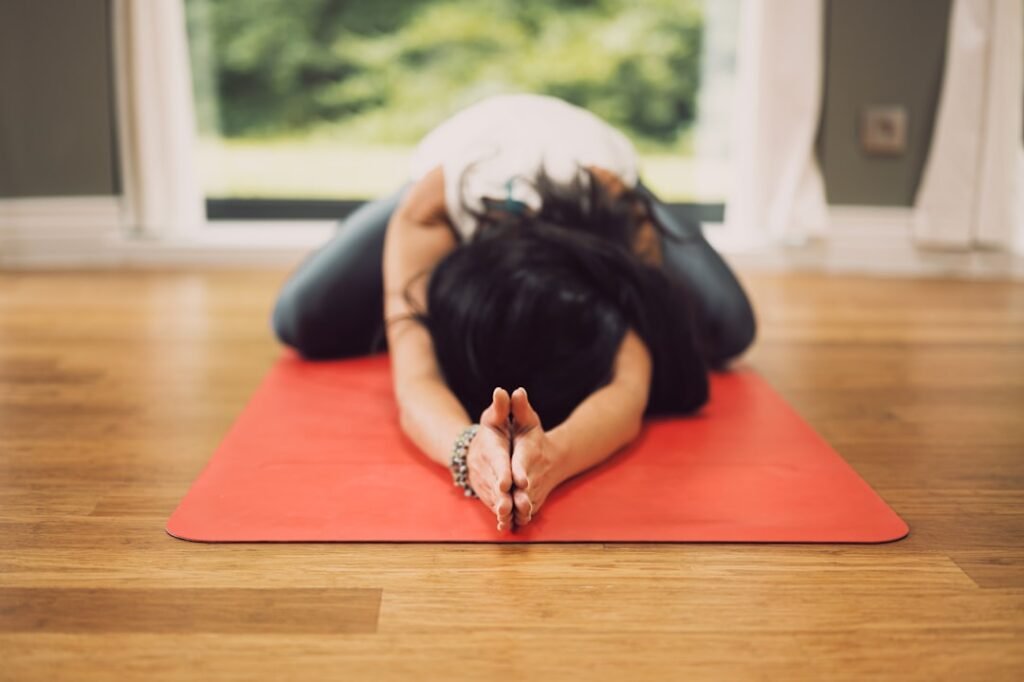
8. Savasana (Corpse Pose) – 3 minutes
Lie flat on your back, arms slightly away from your body, palms up, feet naturally falling open. Close your eyes. Do nothing. This is not optional, and it’s not a rest period between exercises. Savasana is where your nervous system integrates the practice. Skipping it is like cooking a meal and then throwing it away before eating.
Breath cue: Let your breath become natural and uncontrolled. Just observe it.
The Sequence at a Glance
| Pose | Hold Time | Key Benefit |
|---|---|---|
| Child’s Pose | 2 min | Spine decompression, nervous system reset |
| Cat-Cow | 2 min | Spine mobility, breath-movement connection |
| Downward Dog | 90 sec | Full-body stretch, hamstrings, shoulders |
| Low Lunge (each side) | 90 sec x2 | Hip flexor release, lower back relief |
| Seated Forward Fold | 2 min | Hamstring and spine lengthening |
| Supine Twist (each side) | 90 sec x2 | Lower back release, spinal rotation |
| Legs Up the Wall | 3 min | Parasympathetic activation, leg recovery |
| Savasana | 3 min | Nervous system integration |
Total: approximately 20 minutes.
Worth It vs. Skip It for Beginner Yoga
Worth It
- Doing this routine in the evening – the parasympathetic activation makes it excellent for sleep
- Following the breath cues, not just the poses – this is what separates yoga from plain stretching
- Using a folded blanket under your knees for kneeling poses if your joints are sensitive
- Committing to 10 minutes daily over one 60-minute session weekly (per research, frequency beats duration for beginners)
- Staying in Savasana even when you want to skip it
Skip It
- Forcing your body into the “full” version of any pose if you can’t get there comfortably – you’ll strain something and lose a week
- Advanced flows on YouTube before you have the basics – most of them assume 3-6 months of practice
- Holding your breath through difficult poses – this defeats the stress-relief purpose entirely
- Hot yoga as a beginner – the heat masks discomfort signals that help you avoid injury
How Often Should Beginners Practice?
Research cited by FitAndWell suggests 10 minutes daily is more beneficial than a single longer session per week. For stress relief specifically, consistency matters more than duration. Doing this 20-minute routine 3-4 times per week is a realistic starting point that most people can sustain.
Results vary, but most beginners notice improved flexibility and reduced baseline stress within 2-4 weeks of regular practice. The mental effects tend to show up first.
If you’re pairing yoga with other movement, it works well alongside our morning yoga stretches for energy on days you want something lighter, or with our rest day guide if you’re also doing strength or cardio training.
For sleep specifically, pair Legs Up the Wall with the sleep habits in our sleep habits for fitness and fat loss guide.
Frequently Asked Questions
Can a complete beginner do yoga at home without a teacher?
Yes. The poses in this routine are among the safest in yoga, and the instructions include modifications. The main risk for beginners is forcing a stretch too aggressively, which is avoidable by following the “gentle pull, not sharp pain” rule. A teacher is helpful later, once you have a baseline and want to refine form or try more advanced poses.
How long before yoga improves flexibility?
Most people notice genuine flexibility improvements within 3-6 weeks of practicing 3-4 times per week. Hamstrings and hip flexors tend to respond fastest. The lower back and thoracic spine (mid-back) often take longer. Consistency matters more than session length.
Is yoga enough as a complete workout?
For flexibility, stress relief, and gentle strength, yes. For cardiovascular fitness or significant muscle building, no. Most people get the best results combining yoga with some form of cardio and strength training. Yoga works extremely well as a complement to other exercise, and as a standalone practice for mental health and mobility.
What’s the best time of day to practice yoga?
Morning yoga tends to be more energizing. Evening yoga tends to be better for stress relief and sleep. This routine, with its emphasis on restorative poses, is particularly effective in the evening. The most important factor is finding a time you’ll actually stick to. A consistent 8pm session beats a perfect 6am session you skip half the time.
Do I need to be able to touch my toes to start yoga?
No. Most beginners can’t touch their toes when they start. The Seated Forward Fold modification in this routine accommodates any level of hamstring tightness. After 4-6 weeks of regular practice, you’ll likely get noticeably closer. After several months, most beginners reach their feet comfortably.
Roll out your mat tonight. Work through this sequence once. Pay attention to how you feel afterward compared to before. That’s the whole pitch. Everything else follows from there.
Save this routine for your next evening wind-down, or share it with someone who says they’ve been meaning to try yoga.